Quite simply you need Google Tag Manager.
GTM makes your life so much easier. It dispenses with the need to go running to your web developer every time you need to add a tag, code snippet or change the way you track your audience.
This go-to GTM guide is for those who are wondering what all the fuss is about and whether GTM is right for them.
(Hint: it is!)
Here you’ll find all you need to understand about GTM’s functionalities and be introduced to the bounty of benefits that it will bring.
I’ll go on to talk you through how you can get started setting up tags, triggers and variables – and I’ll drop a fair few juicy nuggets along the way in the form of quick pro-tips to use and elephant traps to avoid.
OK? Let’s do this!

Get The Message
(Or, what is GTM?)
Google Tag Manager allows you to manage “tags” quickly and easily.
Have you ever installed an app to your website that requires code to be added? Probably not – most likely you took one look at the installation guide and went running to your (expensive) outsourced web dev team.
GTM allows you to make these changes without dirtying your hands at the back-end of your website.
It requires no technical knowledge – all it asks is that you spend a little time working out how it operates (and I’m about to do that for you here).
Think of Google Analytics: you need to place its tracking code on every page of your site, and manually place other code snippets, such as event code and external codes in the correct locations.
And every time you want to change them or add to them you are on the phone to that web dev team again.
What a waste of time! You can do all this yourself, making the process easier, quicker and more cost-effective.
With one install of the GTM container code on every page of your site you can manage all other code snippets from GTM’s easy-to-use interface and fire them off to your servers in seconds.
Here’s the Big G blowing its own horn: ‘GTM gives you the power to create and update tags for your website and mobile apps, any time you want, at the speed of your business.’
Sounds good? It just gets better.
GTM offers you:
* The ability to add multiple users and control the level of their access through permission levels
* An easy-to-use, intuitive interface that kisses goodbye to the need to twiddle your thumbs while you wait for your request to rise to the top of the web dev team’s pile – meaning you can implement important site changes faster
* Cleaner code with changes held in just one ‘GTM container’ – resulting in increased site speed and performance
* Increased security through version control
* The ability to debug and test functionality before you set any code changes live
Let’s get down to the nitty gritty – here’s how GTM works.
Get Tag Managing
(Or, how GTM works)
This is an intro to how GTM is set up and how you can control the changes made by many users.
GTM is hierarchical (account structure)
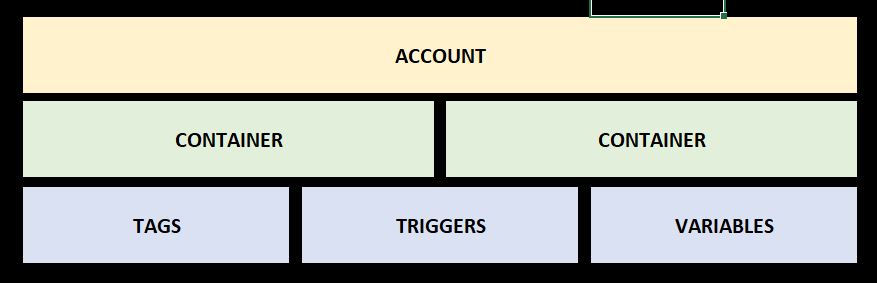
Before you start setting up your GTM account bear in mind that it operates as a top-down hierarchy.
In all likelihood, you will only use one GTM container per site – but it’s worth considering if this will not be the case and multiple containers could be handy.
Take a look at this as an implementation of GTM with multiple containers:
And now let’s fill in the blanks to see why this has been done:
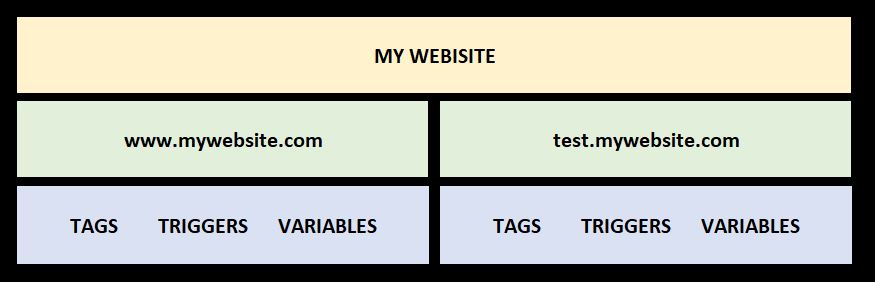
In this example, we’ve used one container for the main site and another for different versions of your site, such as testing and development environments.
You can even use one account for multiple websites by using multiple containers within it, if it makes sense to do so.
GTM can be stepped back (versions)

You’ll love this aspect of GTM – it’s like a kid being given a box of matches with no risk of fire damage.
GTM’s intuitive version control allows you to create, test, implement and undo the things you do. All you need to do is create a new version after every major edit, such as adding or changing a tag, trigger or variable.
And you can step everything back if things aren’t quite right.
Pro-tip: Name your versions by clearly specifying what was done so you can easily find them if you need to.
e.g.
01 – Added trigger to Contact button
02 – Removed old GA tag
You may also want to add in the initials of the person who made the change. A version history like this will allow all account users to clearly see the changes each user has made and make stepping things back easier.
Grant The Minions access
(or, multiple users and GTM)

GTM lets you delegate with confidence, allowing multiple users to make changes as required but limiting access to different levels.
For instance, users can have access permissions at both account and container level.
Account level permissions
- View Account Users
- Manage Account Users, Permissions and Settings
Container level permissions
- View
- View and Edit
- View, Edit, Delete and Publish
Get The Meaning?
(Or, understanding GTM’s tags, triggers and variables)
Introducing tags
Tags are the meat in GTM’s sandwich. It is tags that contain the actual code that is fired when criteria (or triggers) are met. Quite literally, without tags you just have an empty container – or two slices of bread.
Here’s what you need to define to set up a tag:
- Name (I told you this was easy)
- Choose product (where do you want to place this tag?)
- Choose a tag type (what is your tag?)
- Configure Tag (this only shows for some tag types, including Google Analytics)
- Fire On (when does the tag fire? And ‘Create Exceptions’ sets when it doesn’t)
There are many different types of tags, including both pre-set and custom ones. In a moment, I’ll walk you through some of the most common ones – and you can discover the rest for yourself as you gain confidence.
But before I do this you’re going to have to sing for your supper and learn all about triggers and variables.
Introducing triggers

No, not him!
Triggers are the criteria that tell tags when to fire.
This can be as simple as the pre-defined ‘All Pages’. But it can be as complex or precise as you need, too. Click Listener tags let you get really specific and combine criteria to tags fire only when very specific actions happen – such as a click on a button that does not lead to another page being served.
Triggers, unlike tags, are not set up from the Overview window. They can be set up in the tag window itself or if you already have a trigger that does the job you can select existing triggers and apply them instantly to your tag.
Each tag is made up of one or many conditions and each condition can be used to do much more than make tags fire on all pages. Triggers are made up of conditions – sometimes a single condition (such as in the ‘All Pages’ trigger to the right) and sometimes a combination of numerous conditions, with three key elements for each condition need the following defining:
- Name
- A variable that you want the trigger to be dependent on (hold your horses – we’re getting to variables in just a mo!)
- The operation that identifies what type of match you need (what happens?)
- The value that you are setting (what condition must be met)
Finally, triggers can be used to set firing criteria but they can also be used to create exceptions.
Introducing variables
You can think of variables as the conditions that tell a trigger it’s showtime – but they are a bit smarter than that.
Variables also can be used for many different uses (triggers and tags) so that you only have to update the variable (not each tag and trigger) if something changes
They also allow you to call on a single variable for multiple uses without having to update each tag or trigger if something changes. It is a massive time-saving feature.
Sorry but there’s nothing for it but to slip into web dev speak when we look at the types of variable available – but you’ll soon get the hang of it.
Here we go:
- Constant String
- Custom JavaScript
- Data Layer Variable
- HTTP Referrer
- Lookup Table
- URL
Get Things Moving (or, some useful GTM tags to get you started)
Google Analytics tag

To create this tag, simply choose Google Analytics as the product in the first section.
You’ll need your Tracking ID (here’s how to find it) and you’ll need to tell GTM when to fire the tag. This is simply the pre-defined ‘All pages’.
Job (almost) done!
Testing your tags
Tags are not automatically live once you save them: you need to create a new version and set this live to unleash them into the world and out of your container.
You can test your latest version first using the ‘Preview and Debug’ option in the ‘Publish’ drop-down menu.
When ‘Preview’ mode is activated, you will see a banner similar to this – and when you visit your website in another tab within the same browser, you will see the GTM preview bar at the bottom of the screen. You can use this to check which tags have fired and which ones haven’t.
Cool?
Hit ‘Publish’ and your version is set live.
Your tag is firing away to its heart content – you can verify this using the Real-Time reports in Google Analytics.
Custom HTML tags

Custom HTML tags fire a snippet of HTML, such as a script, when certain triggers are met. This can fire on all or on specific pages only.
For example, you could create a Custom HTML tag to fire site search schema mark-up only on your home page (where the code should be used).
Google Ads tag

Google Ads are tracked via Conversion Tracking tags and Remarketing tags. Using tags to create these is a simple way to implement the code you normally have to manually build into your code.
And all you need to do is populate a few fields with your account details. And you can find out more about this here.
(It’s up to you if you want the triggers to fire only on selected pages or site-wide.)
Other pre-set tools
GTM makes everything simple with pre-set tools for:
- DoubleClick Floodlight
- Crazy Egg
- Bing Ads
- Marin Software
- Clicktale Standard Tracking
- comScore Unified Digital Measurement
- Google Certified Shops
- AdRoll Smart Pixel
- AdAdvisor
- LinkedIn Insight
And new ones are being added all the time.
It just gets better snd better!
Get That Mojo working

There’s no need to be afraid of the big, bad GTM wolf.
GTM is your knight in shining armour.
And hopefully you can see the benefits and how easy it is to get started.
So, stop waiting.
Let’s get your mojo working and fire some tags!